flutterでColumn/Row/Center/Containerの理解が曖昧な方向け。
flutterでアプリ開発を行う際に頻出する項目の一つのため、この記事でなるべくわかりやすく解説します。
ColumnとRowを使いこなしてオブジェクトを自由に配置できるようになりましょう。
この記事は以下のような方を対象者としています。
- flutter初学者の方
- flutterでオブジェクト配置のやり方が分からない方
- flutterでレイアウトの設定のやり方が分からない方
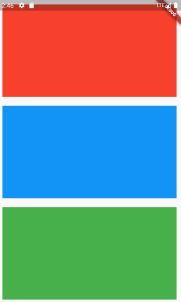
今回使用するデモコード#

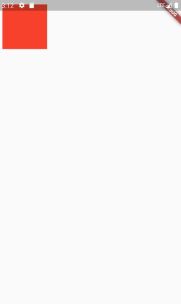
まずは、こちらのソースコードをご覧ください。
こちらのコードは赤色、青色、緑色の四角形型オブジェクトを描画するデモコードです。
こちらのソースを元に解説していきます。
class SplashScreen extends StatefulWidget {
  SplashScreen({Key key, this.title}) : super(key: key);
  final String title;

  @override
  _SplashScreenState createState() => _SplashScreenState();
}

class _SplashScreenState extends State<SplashScreen> {
  @override
  Widget build(BuildContext context) {
    return Scaffold(
     body: Container(
        <!-- 今回の説明部分 -->
        child: Row(
            children: <Widget>[
                Expanded(
                    child: _redBoxWidget(),
                ),
                Expanded(
                    child: _blueBoxWidget(),
                ),
                Expanded(
                    child: _greenBoxwidget(),
                )
            ],
       ),
    ));
  }
}

<!-- 赤色のボックスを描画 -->
Widget _redBoxWidget() {
  return Container(
    color: Colors.red,
    padding: EdgeInsets.all(10.0),
    margin: EdgeInsets.all(10.0),
  );
}

<!-- 青色のボックスを描画 -->
Widget _blueBoxWidget() {
  return Container(
    color: Colors.blue,
    padding: EdgeInsets.all(10.0),
    margin: EdgeInsets.all(10.0),
  );
}

<!-- 緑色のボックスを描画 -->
Widget _greenBoxwidget() {
  return Container(
    color: Colors.green,
    padding: EdgeInsets.all(10.0),
    margin: EdgeInsets.all(10.0),
  );
}
flutterをわかりやすく : Rowとは#

Rowプロパティとはオブジェクトを横並べにしたい時に使います。
デモアプリでも子要素のChildren内のウィジェットがRowの設定により横並びになっています。
デフォルトの設定ではこれら子ウィジェットはスクロールすることはできません。
また、もしも子ウィジェットが多数ある場合にはChildrenで囲むよりもListViewを使う方が好ましいです。
また、もしスクロールが必要な場合は別途別のウィジェットでラッピングする必要がありますが、詳しくは別記事で説明予定です。
class _SplashScreenState extends State<SplashScreen> {
  @override
  Widget build(BuildContext context) {
    return Scaffold(
        body: Container(
        <!-- 横並びレイアウトにするためRowで設定 -->
        child: Row(
            children: <Widget>[
            Expanded(
                child: _redBoxWidget(),
            ),
            Expanded(
                child: _blueBoxWidget(),
            ),
            Expanded(
                child: _greenBoxwidget(),
            )
            ],
        ),
    ));
  }
}
flutterをわかりやすく : Columnとは#
こちらはRowとは逆にオブジェクトを縦並べにしたい時に使います。
Row同様にChildren要素内に複数のオブジェクトを配列形式で保持することができる。
class _SplashScreenState extends State<SplashScreen> {
  @override
  Widget build(BuildContext context) {
    return Scaffold(
        body: Container(
        <!-- 縦並びレイアウトにするためColumnで設定 -->
        child: Column(
            children: <Widget>[
            Expanded(
                child: _redBoxWidget(),
            ),
            Expanded(
                child: _blueBoxWidget(),
            ),
            Expanded(
                child: _greenBoxwidget(),
            )
            ],
        ),
    ));
  }
}
flutterをわかりやすく : Centerとは#
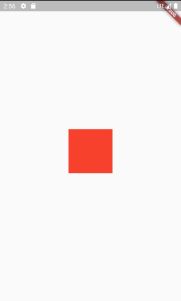
Centerは子ウィジェットを中央に配置することができるウィジェットです。
CenterはColumnやRowのように複数の子ウィジェットを設定することはできません。
そのためデモコードもchildrenからchildプロパティに変更しています。
また、Centerウィジェットが動作していることをわかりやすく伝えるため、redBoxWidgetにwidth,heightプロパティを100ずつで設定しています。
class _SplashScreenState extends State<SplashScreen> {
  @override
  Widget build(BuildContext context) {
    return Scaffold(
        body: Container(
          child: Center(
            child: _redBoxWidget(),
      ),
    ));
  }
}

Widget _redBoxWidget() {
  return Container(
    <!-- 中央配置を確認するためwidthとheightを100に設定 -->
    width: 100,
    height: 100,
    color: Colors.red,
    padding: EdgeInsets.all(10.0),
    margin: EdgeInsets.all(10.0),
  );
}
flutterをわかりやすく : Containerとは#
こちらは子ウィジェットでカスタマイズするための基本ウィジェットです。
paddingの設定や背景設定も子ウィジェット内で設定することで柔軟にカスタマイズすることができます。
class _SplashScreenState extends State<SplashScreen> {
  @override
  Widget build(BuildContext context) {
    return Scaffold(
        body: Container(
          child: Center(
            child: _redBoxWidget(),
      ),
    ));
  }
}

Widget _redBoxWidget() {
  return Container(
    <!-- 中央配置を確認するためwidthとheightを100に設定 -->
    width: 100,
    height: 100,
    color: Colors.red,
    padding: EdgeInsets.all(10.0),
    margin: EdgeInsets.all(10.0),
  );
}
さいごに
ここまでお読みいただきありがとうございました。
私のブログ記事を読んでいる方の中には海外転職・海外移住への興味がある方もいらっしゃるかと思います。
【海外挑戦を検討中の方へ】
ベトナムで8年働いて実感したのは、エンジニアスキル以上に「ビジネス英語」がキャリアの選択肢を広げるということです。
Bizmates(ビズメイツ)は、IT・エンジニア専用の教材が豊富で、現場で即戦力になる英語が身につきます。
![]()
僕はもともと営業職から転職してITエンジニアになり、現在ベトナムで働き始めて8年目になります。
現在は現地のIT企業に勤めながら、個人でアプリ開発およびブログ執筆を続けております。
ご興味があれば、ぜひ私が開発している個人アプリもチェックしてみてください。
語学学習や日常生活に役立つアプリを中心に、Google Play ストアで無料公開しています。
また、YouTubeチャンネルでは海外生活やアプリ開発に関する情報を発信しています。
海外就職のリアルな体験談やエンジニアとしてのキャリア形成についても触れていますので、
興味のある方はぜひチャンネル登録していただけると嬉しいです。
開発アプリ一覧
個人でAndroidアプリ開発を行なっており、下記がこれまでリリースしたアプリ一覧です。
Lull - 寝落ち環境音:AIが創る究極の安眠BGM

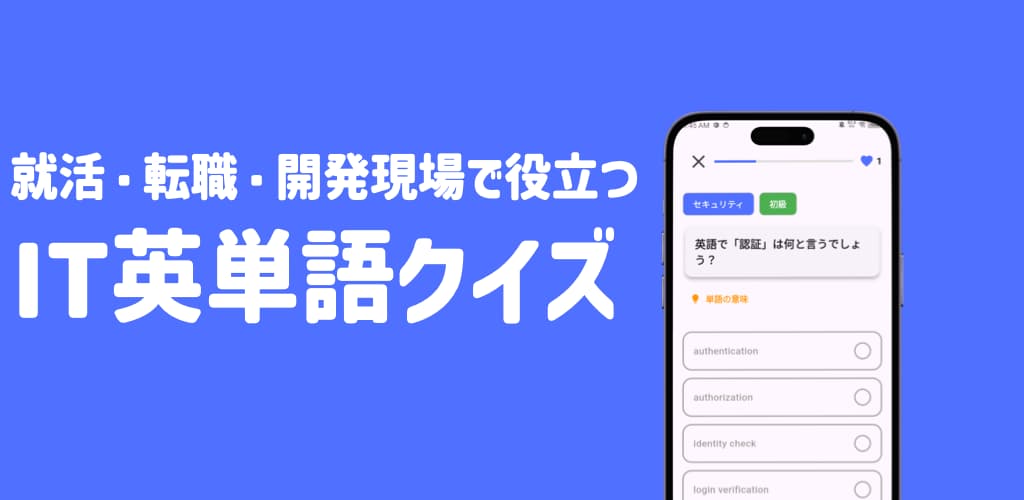
IT英単語クイズ
💡 さらにスキルアップ: アプリで語彙を増やしたら、Bizmatesの実践形式レッスンでアウトプットするのが最強の学習ルートです。
![]()